
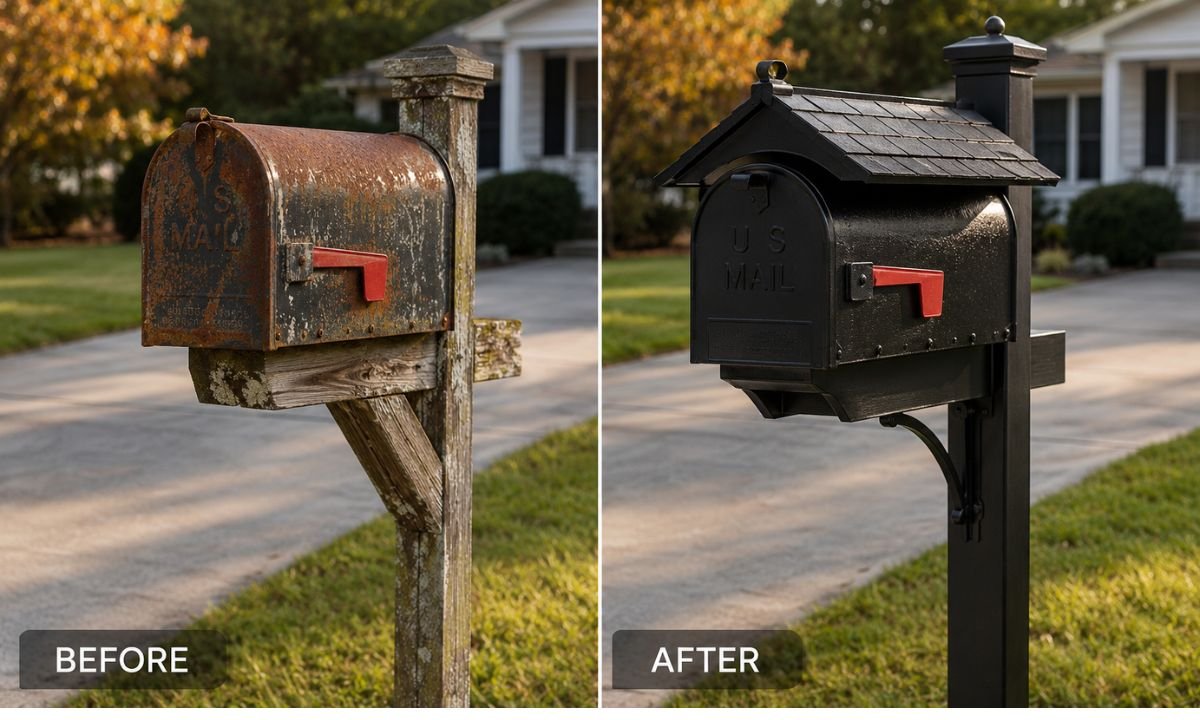
A mailbox renovation is one of the most satisfying DIY projects a homeowner can take on — high visibility results, low cost, and no specialized skills required. A weekend afternoon, $25 in materials, and some patience is all it takes to turn a weathered, faded box into something that looks intentional and well-maintained.
Here’s the complete DIY process, plus the one upgrade most people miss that makes the difference between a renovation that lasts one season and one that lasts five years.
For more guides on mailbox maintenance, installation, and upgrades, visit the Mailbox Avenue blog.
What You Need Before You Start
Gather everything before touching the mailbox — stopping mid-project to buy supplies extends drying time and risks weather exposure on unfinished surfaces.
Materials :
- 80-grit and 120-grit sandpaper
- Rust remover gel for any pitting or corrosion
- Rust-inhibiting spray primer for metal
- Outdoor enamel spray paint in your chosen color
- Clear protective topcoat
- Replacement hardware if needed — screws, flag, or lock
- Outdoor silicone sealant
Total cost : $20 to $35 at any hardware store. The rust-inhibiting primer is the most important item — don’t substitute general-purpose primer. It’s the difference between paint that holds for five years and paint that peels in twelve months.
For seasonal refresh options that complement any exterior renovation, browse our full mailbox cover collection — designs for every season, all compatible with standard curbside mailboxes.
The Process — Step by Step
Remove and clean. Detach the mailbox from the post if possible. Clean all surfaces with warm soapy water, scrubbing away dirt, grime, and oxidation. Dry completely before any sanding — wet metal doesn’t sand evenly.
Sand everything. Start with 80-grit on all exterior surfaces to remove loose paint, rust, and gloss. Finish with 120-grit for a smooth base. This step determines the quality of everything that follows — don’t rush it. Any glossy surface left unsanded will cause the new paint to peel.
Remove rust. Apply rust remover gel to any pitted or corroded areas. Let it dwell for 10 to 15 minutes, scrub with a wire brush, wipe clean. Allow to dry fully.
Prime. Apply rust-inhibiting primer in two thin coats, allowing each to dry completely between applications. Pay extra attention to seams and edges — these are where future corrosion starts.
Paint. Apply outdoor enamel in two to three thin coats. Hold the can 10 to 12 inches from the surface and keep it moving — stopping creates runs. Allow full cure time before handling — typically 24 hours.
Seal and reassemble. Apply a clear protective topcoat for UV and weather resistance. Replace any worn hardware — a new flag and fresh address numbers complete the transformation.
The Upgrade Most DIYers Skip
The exterior renovation handles the structural and cosmetic restoration. The aesthetic upgrade that makes the biggest visual difference is a mailbox cover — a magnetic or wraparound decorative panel that fits over the painted box and can be swapped seasonally without any tools or additional work.
A renovated mailbox and a well-chosen cover is a $50 weekend project that changes the entire first impression of your property — and that’s the best return on time any DIY project can offer.